Fish Audio's podcast transcription tool converts audio to text with automatic emotion tags, speaker labels, and timestamps — then exports to SRT, VTT, or JSON. Free tier available. No code required.
March 2026 | Fish Audio STT is now live at fish.audio/app/speech-to-text
Every podcast episode you publish without a transcript is leaving traffic on the table. A transcript makes your episode searchable on Google, gives you show notes in one click, and lets you generate subtitles automatically — for YouTube, your website, or anywhere else you distribute. For hearing-impaired audiences, it also makes your content accessible. Podcast editors, media teams, and YouTube creators rely on transcripts to generate SEO content, searchable archives, and accessible episode pages. Most podcast transcription tools give you a wall of plain text and call it done. Fish Audio's podcast transcription tool goes further: every transcript comes with automatic emotion and paralanguage tags, speaker labels, timestamps, and three export formats. This guide walks you through the full workflow, from upload to export, in about three minutes.
What Makes a Good Podcast Transcription Tool?
Before choosing any transcription tool, it helps to know what you're actually evaluating. A good podcast transcription tool should provide four things:
- High transcription accuracy across different accents, audio quality, and recording environments
- Speaker identification so you can tell your host from your guest in the transcript
- Multiple export formats — at minimum SRT for video subtitles, and ideally VTT and JSON as well
- Transparent, affordable pricing with a free tier that's actually usable for a real episode
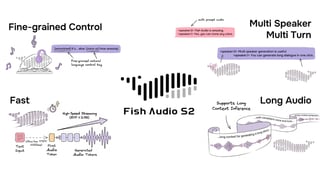
Fish Audio's podcast transcription tool supports 100+ languages, accepts 24 audio and video formats, and automatically tags emotion and paralanguage events inline — without any manual annotation. The speech-to-text model is optimized for conversational audio and multi-speaker recordings such as podcasts, interviews, and live discussions. Here's how it works in practice.
How to Transcribe Your Podcast with Fish Audio — Step by Step
Time required: ~3 minutes Tools needed: Audio file (MP3, MP4, WAV, M4A, and more) Output: Tagged transcript + subtitle file ready for export
Step 1 — Open Fish Audio STT
Go to fish.audio/app/speech-to-text. You'll see your task history — all previous transcriptions listed with filename, date, status, credits used, and speaker count. Click Create task to start a new transcription.

Step 2 — Upload your episode and set speakers
In the Create transcription task window, upload your audio or video file. Fish Audio accepts all major formats — MP3, MP4, WAV, FLAC, M4A, OGG, MOV, AVI, WEBM, and more.
Under the number of speakers, leave it on Auto if you're not sure how many people are in the recording. Fish Audio will detect speakers automatically. If you know the exact number — say, two for a standard host-and-guest format — you can set it manually for more accurate speaker labels.
Before you confirm, the interface shows you the estimated duration, billable minutes, and estimated credits for this task. You're not charged until you click Create task.

Step 3 — Review your transcript
Once the task is completed, click Open viewer. The transcript is displayed in three columns: SPK/TAGS (speaker label), TIME (timestamp range), and TEXT (the transcript with inline tags).
Every segment is timestamped down to the second. Emotion and paralanguage events appear as purple inline tags directly inside the text — you'll see things like [pause], [sigh], [emphasis], and [breath] at the exact point in the recording where they occurred.
Click any segment to play back that portion of the audio directly in the browser. This makes it easy to verify accuracy or spot-check specific moments without scrubbing through the whole file.
The right-hand Controller panel shows a summary: total duration, number of speakers detected, number of segments, and confirmation that voice separation and Tag audio events are both on.

Step 4 — Export in your format
Click Export in the bottom right of the Controller panel. Choose your format and configure the export options before downloading.


Ready to transcribe your first episode? Start a free transcription task →
Automatic Tags — What Fish Audio Captures That Other Tools Miss
This is where Fish Audio's podcast transcription tool diverges most clearly from the alternatives.
When someone sighs before answering a question, laughs at mid-sentence, pauses for emphasis, or takes an audible breath — the standard transcription tools ignore all of that. You get the words, stripped of everything else.
Fish Audio embeds these events as inline tags at the exact point they occur in the transcript. These tags are generated automatically — no manual annotation, no post-processing step. The Controller panel shows Tag audio events: On by default.
What gets tagged
Paralanguage — non-verbal sounds that occur alongside speech.
Emotion — affective tone of delivery, captured from context and prosody.
Why this matters to podcasters
For most podcast workflows, tags serve three practical purposes. First, they make your transcript more useful as a Show notes source — a transcript that captures [laugh] and [pause] gives your editor richer material to work with than a flat text file. Second, they make it faster to navigate long recordings — you can scan for [sigh] or [emphasis] moments to find emotionally significant parts of the episode without re-listening. Third, and most distinctively, these tags are compatible with Fish Audio's TTS model — meaning a transcript can feed directly back into a voice production workflow without any reformatting.
Want to see the tags in action? Upload your first audio file →
Export Formats Explained — Which One Do You Need?
Fish Audio STT supports three export formats. Which one to use depends on what you're doing with the transcript next.
SRT is the right choice for most podcasters distributing video content. It's the most widely supported subtitle format — compatible with YouTube, Premiere Pro, Final Cut Pro, and most video platforms.
VTT (WebVTT) is the web-native format — use it when you're embedding video on your own site and need inline word timing.
JSON gives you the raw STT output without subtitle transformations. Use this if you're feeding the transcript into another tool or building something custom.
Export options
When exporting SRT or VTT, you have four additional settings:
- Include tags — keeps bracketed events like
[pause]and[sigh]in the subtitle file. Turn this off for clean subtitles; leave it on if you want the expressive metadata preserved. - Include speaker — prefixes each subtitle cue with the detected speaker label (SPK_0, SPK_1). Useful for multi-speaker episodes.
- Punctuation — keeps punctuation in the exported text. Turn off for a cleaner token stream if you're doing further processing.
- Split mode — choose between Segment (keeps existing STT boundaries) or Max words (regroups cues by word count, punctuation, and speaker changes). Max words with a cap of 7 words per cue tend to produce more readable subtitles for fast speech.
Speaker Detection — Telling Your Host from Your Guest
For podcast interviews and panel discussions, speaker detection is one of the most useful features a podcast transcription tool can offer. Fish Audio automatically separates speakers in multi-person recordings. Each segment in the transcript viewer is labeled SPK_0, SPK_1, and so on — corresponding to distinct voices detected in the audio.
When creating a task, you can either leave the number of speakers on Auto or set it manually. Setting the exact number tends to produce cleaner speaker boundaries, especially in recordings where one speaker is significantly quieter than the other.
When exporting, enabling Include speaker adds the speaker label as a prefix to each subtitle cue. This makes it straightforward to search, edit, or reformat transcripts by speaker — useful if you're pulling quotes for Show notes or editing a transcript down to key exchanges.
Note: Speaker detection and speaker-labeled transcripts are available in the Fish Audio web interface. Speaker labels travel with export in SRT, VTT, and JSON formats when Include speaker is enabled.
How Much Does It Cost to Transcribe a Podcast?
Fish Audio STT is billed by the minute of audio processed at 300 credits per minute.
Free accounts receive 8,000 credits per month — enough for approximately 26 minutes of audio. That covers a short-form episode or a few interview segments.
The web interface shows you the exact estimated credits before you confirm a task, so there are no surprises.
For teams or high-volume production, paid plans include larger credit pools. See the full pricing breakdown at fish.audio/plan/.
Transcribe your next podcast episode in minutes. Start transcribing for free →
Fish Audio vs Other Podcast Transcription Tools
Many podcasters searching for the best podcast transcription tool find that the right choice depends on whether they need plain text transcripts or richer metadata like emotion tags and multi-format export. Here's how Fish Audio compares to other popular options:
Data sourced from Otter.ai, Happy Scribe, and Adobe Podcast as of March 2026.
Most podcast transcription tools focus on delivering plain-text output. Fish Audio is one of the few that embeds emotion and paralanguage tags directly inside the transcript — and one of the few tools that connects transcription to a voice production workflow via Studio integration.
If you need clean plain text to show notes or SEO content, any of these tools will work. If you need tagged transcripts, multi-format export, or a path from transcript into voice production, Fish Audio is the most complete option.
What's Next — From Transcript to Studio
A tagged transcript is more than a document. It's a script that already knows how it should sound.
The tags Fish Audio embeds in your podcast transcript — [calm, reflective], [breath], [determined], [pause] — use the same format as Fish Audio's S2 TTS model. That means a transcript can feed directly into a voice generation pipeline without any reformatting.
Fish Audio Studio takes this further. In Studio, tagged scripts become fully editable voice projects: you can edit by chapter, swap voice models, adjust delivery at the word level, and produce multi-track audio — all with the expressive metadata from your original recording intact.

STT-to-Studio direct import is a coming soon feature. The transcript format is already compatible — the tags in your STT output are the same tags Studio reads. Import will be a single step once the feature ships.
Start transcribing your podcast for free → — or Explore Fish Audio Studio if you're ready to produce.
Related:

Sabrina is part of Fish Audio's support and marketing team, helping users get the most out of AI voice products while turning launches, updates, and customer insights into clear, practical content.
Read more from Sabrina Shu